Ensuring your vehicle operates at peak efficiency requires understanding the critical role of the front oxygen sensor. Positioned as a key component in your engine's system, the front oxygen sensor significantly influences performance, fuel economy, and emission control. A faulty sensor can lead to noticeable declines in these areas, making timely replacement essential. This guide dives deep into the process of front oxygen sensor replacement, offering detailed insights into identification, tools required, and installation steps, along with practical tips for maintaining optimal vehicle performance.
This article delves into the functionality of the front oxygen sensor, clear indicators of failure, and a comprehensive replacement process. It also outlines the necessary tools for successful installation and shares expert advice on prolonging the life of your vehicle’s oxygen sensors. By the conclusion of this guide, you will have a thorough understanding of how to effectively replace your front oxygen sensor, empowering you to maintain your vehicle’s efficiency and reliability.
Whether you're an experienced mechanic or a car owner looking to enhance your automotive knowledge and save on repair costs, this article provides the expertise needed to approach front oxygen sensor replacement with confidence. Let’s explore the details.
Read also:Who Is Justin Sanes Wife
Table of Contents
- What is an Oxygen Sensor?
- Role of the Front Oxygen Sensor
- Identifying Signs of Sensor Failure
- Essential Tools for Replacement
- Step-by-Step Replacement Guide
- Post-Replacement Inspections
- Maintaining Oxygen Sensors for Longevity
- Final Thoughts
What is an Oxygen Sensor?
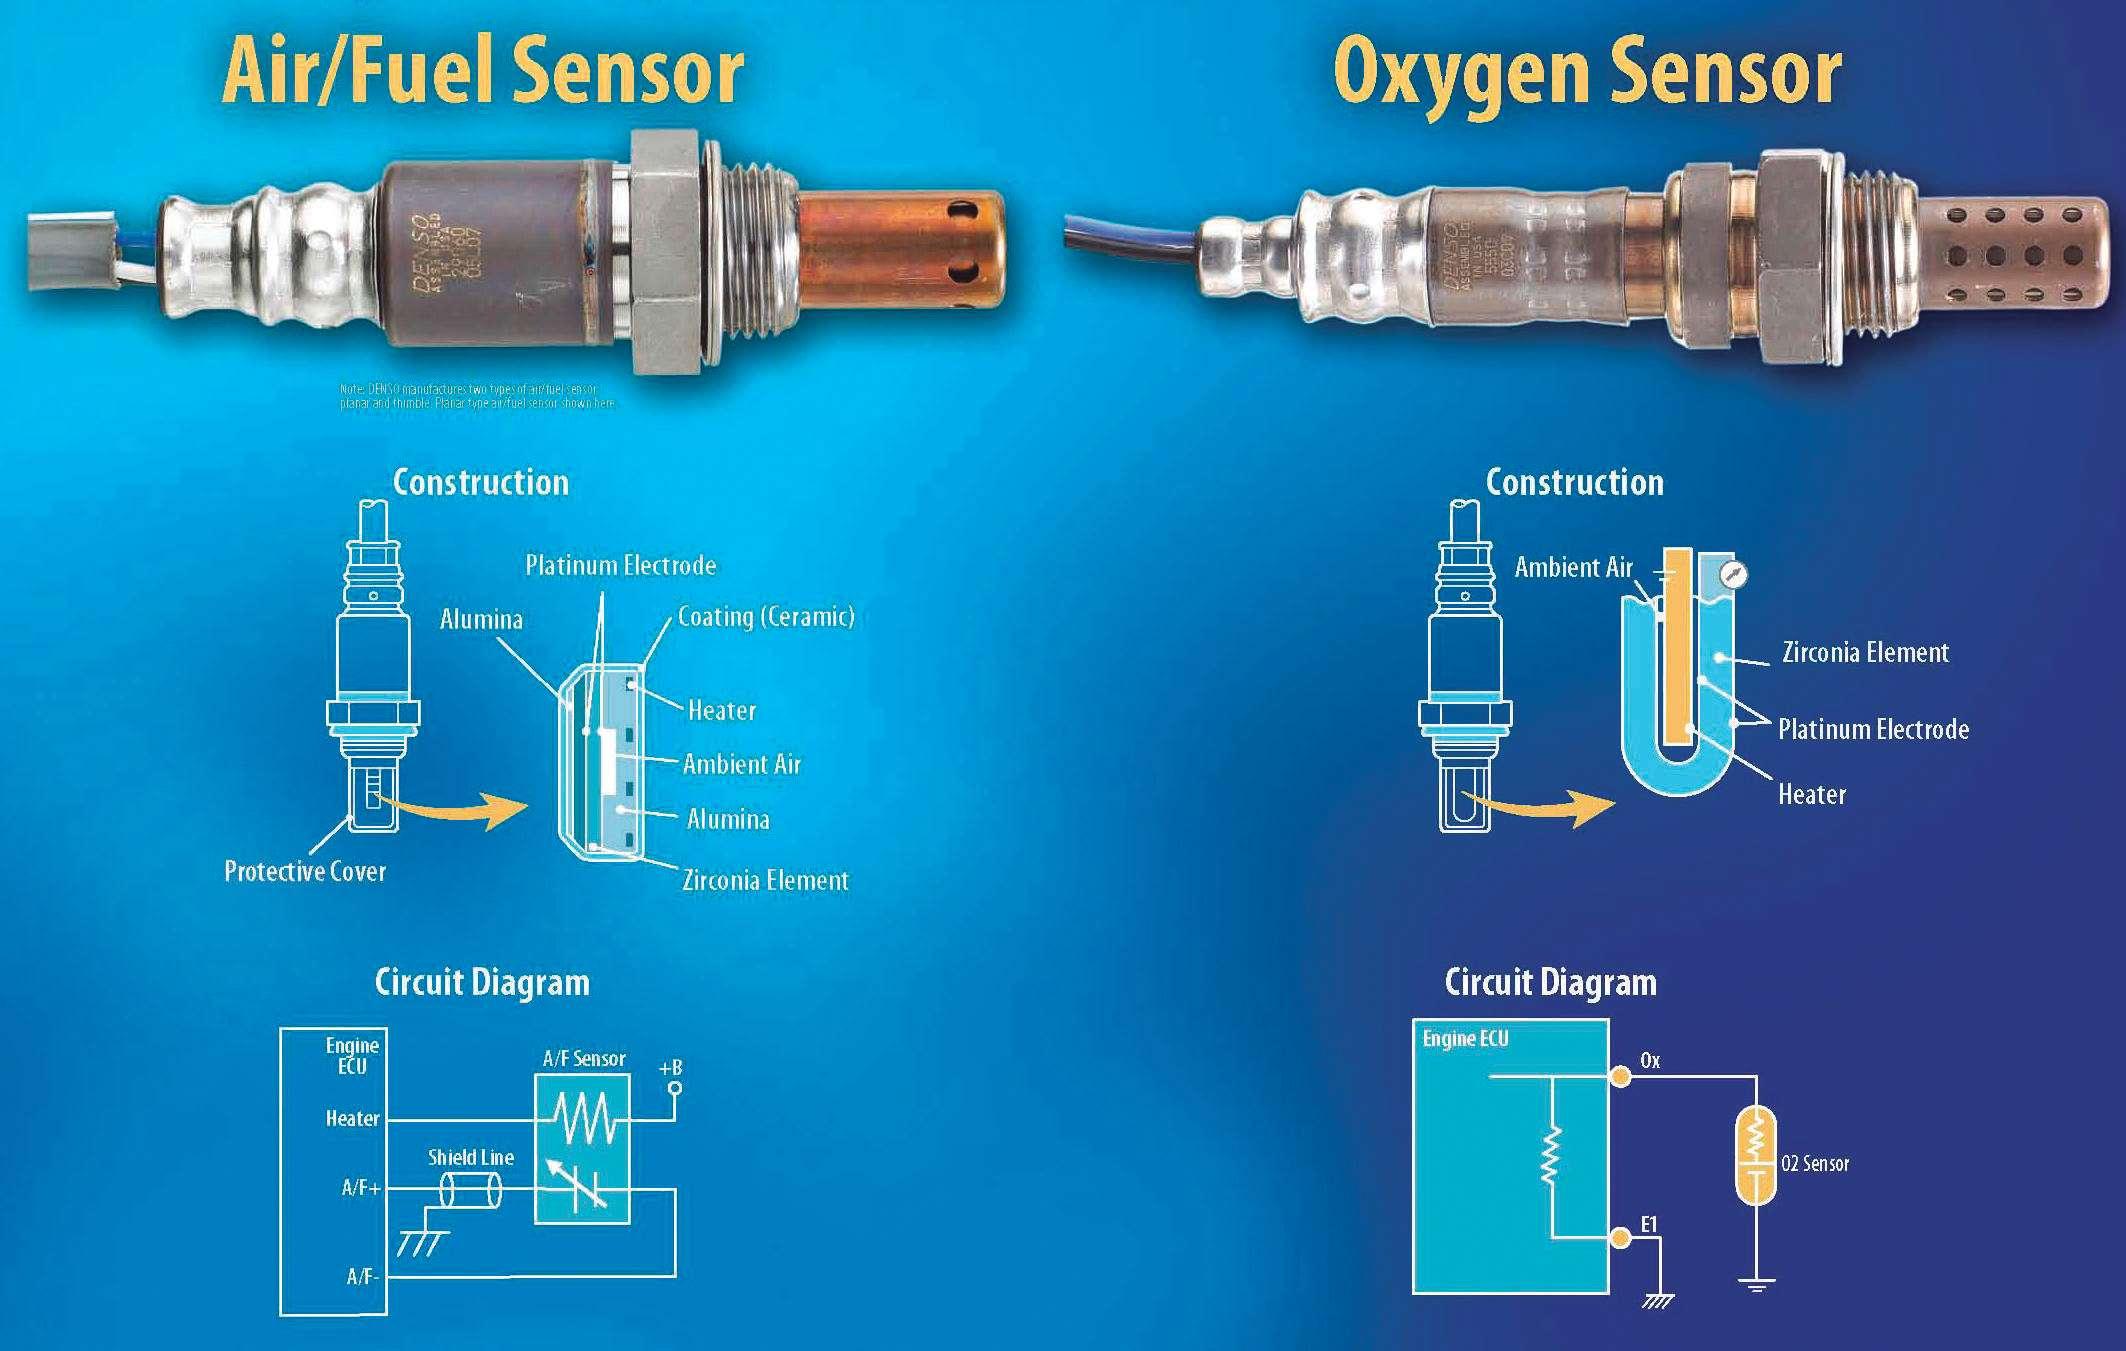
An oxygen sensor is a vital component integrated into a vehicle’s exhaust system. Its primary function is to measure the oxygen levels in the exhaust gases and transmit this data to the engine control unit (ECU). This information enables the ECU to adjust the air-fuel mixture for optimal combustion, ensuring efficient engine operation and minimizing harmful emissions.
Types of Oxygen Sensors
- Wideband Oxygen Sensors
- Narrowband Oxygen Sensors
While narrowband sensors are predominantly used in older vehicles, wideband sensors have become the standard in modern cars due to their superior accuracy in monitoring the air-fuel mixture. This advancement enhances vehicle performance and environmental sustainability.
Role of the Front Oxygen Sensor
The front oxygen sensor, also referred to as the upstream oxygen sensor, is positioned before the catalytic converter. Its core responsibilities include:
- Monitoring the air-fuel mixture to ensure it aligns with the engine’s requirements.
- Facilitating optimal combustion for enhanced engine performance.
- Minimizing harmful emissions to comply with environmental regulations.
- Boosting fuel efficiency by ensuring the engine operates at its most effective state.
By continuously providing real-time feedback to the ECU, the front oxygen sensor plays a pivotal role in maintaining engine health and preventing potential damage to other components, such as the catalytic converter.
Identifying Signs of Sensor Failure
Recognizing the warning signs of a failing front oxygen sensor is crucial for maintaining your vehicle’s overall health. Below are some common indicators:
- Check Engine Light: A warning light illuminated on your dashboard could signify an issue with your oxygen sensor.
- Poor Fuel Economy: A malfunctioning sensor may cause an imbalance in the air-fuel mixture, leading to increased fuel consumption.
- Rough Idling: If your engine experiences irregular idling or frequent stalling, it might be due to a faulty oxygen sensor.
- Increased Emissions: A failing sensor can result in higher emissions, potentially causing your vehicle to fail an emissions test.
Essential Tools for Replacement
Before initiating the replacement process, ensure you have the following tools at hand:
Read also:Understanding The Code What Is Xnxnxnnx
- Oxygen Sensor Socket
- Ratchet and Extension
- Safety Gloves
- Safety Goggles
- New Oxygen Sensor
- Clean Cloth
- Anti-Seize Compound (Optional)
Step-by-Step Replacement Guide
Follow these detailed steps to replace your front oxygen sensor:
- Prioritize Safety: Disconnect the vehicle's battery to avoid any electrical hazards.
- Locate the Sensor: Identify the front oxygen sensor, typically found on the exhaust manifold or near the engine block.
- Remove the Old Sensor: Utilize the oxygen sensor socket to carefully unscrew the old sensor, being cautious of residual heat if the engine was recently running.
- Prepare the New Sensor: Apply a small amount of anti-seize compound to the threads of the new sensor, as recommended by the manufacturer.
- Install the New Sensor: Screw the new sensor in by hand initially, then secure it with the socket. Avoid overtightening to prevent damage.
- Reconnect Battery: Once the new sensor is securely in place, reconnect the vehicle's battery.
- Test the Vehicle: Start the engine and verify that no warning lights are present. Take the vehicle for a test drive to ensure everything functions correctly.
Post-Replacement Inspections
After successfully replacing the front oxygen sensor, it’s important to conduct a few checks:
- Examine the exhaust system for any leaks.
- Monitor fuel efficiency over the following weeks to assess improvements.
- Be vigilant for any unusual engine performance issues that may arise.
Maintaining Oxygen Sensors for Longevity
To extend the lifespan of your oxygen sensors, consider implementing the following maintenance practices:
- Regularly replace your vehicle’s air filter to prevent contaminants from reaching the sensors.
- Opt for high-quality fuel to minimize deposits that could affect sensor performance.
- Schedule routine engine tune-ups to maintain overall engine health and efficiency.
- Ensure the exhaust system remains free of leaks, which can prematurely wear out the sensors.
Final Thoughts
Replacing the front oxygen sensor is a fundamental maintenance task that can substantially influence your vehicle’s performance and fuel economy. By being aware of the signs of a failing sensor and following the outlined replacement process, you can ensure your vehicle operates smoothly and efficiently. If you found this guide helpful, please share your thoughts in the comments section, share this article, or explore other informative content on our website.
Thank you for reading! We look forward to welcoming you back for more valuable automotive insights and tips.